SHAD2: shaders, but more difficult
quick disclaimer before i begin, i’m gonna say a lot of only vaguely accurate stuff, to give a general idea of things instead of trying to perfectly accurately describe How Things Work. i’m not an expert in any kind of low level computer stuff, so everything is based off my vague understanding and shouldn’t be taken as The Truth entirely! to help out a bit i’m gonna put an asterisk after everything that i’m pretty sure is inaccurate. the point is to describe enough to make my point and help give all the info you need for what the article is about. thanks for understanding!!!
just give me the shader file please
modern game engines are Very Good* and its very nice not to have to think about a lot of things when making games. gone are the days that you must know how to handle every aspect of how a game runs before you can even begin your new cool pong mmo*. it’s for precisely this reason i’m making my own
i’ll cover DISASTER ENGINE more in the future* but for now i’ve been dealing with one particular gripe; i’m building on top of unity for now so i can focus on the unique features of my engine before tackling the lower end of things, and for 99% of things this is working out very well*. unity is mostly just acting as a window manager, renderer and input handler while i do most of everything else in DISASTER ENGINE*. one of the driving forces behind it is exposing every piece of content the game uses, every texture, model, and script are stored externally, making every game made in the engine inherently moddable* (just start messing with the files).
there is one kind of asset, however, that unity does not let you load externally*. its shaders! (pretty sure ue4 doesn’t either*, but it looks like godot can?* i digress)
why move forward when we can move backwards
shaders are computer programs to do complex geometry and other graphical work on the graphics card, which are specialised to process that kinda stuff*, leaving the CPU to keep doing what it’s good at*. the most common cases are transforming 3d models to view space and calculating the correct texture coordinates of every pixels on screen* etc. they’re good at letting you see things*
shader languages are c-based programming languages that were created to write the programs for your gfx card to run, and they’re very powerful, and reasonably comfortable to learn*. in recent years, there’s been a rise in the creation of node based shader editors, taking advantage of the specific ways shaders work* and creating awesome easy to use and powerful interfaces for people to create Cool Shaders, without having to touch a line of code.
moving from C-style language to nodes is a very logical and powerful step*, since text-based coding is an often less-intuitive way to think about how shaders work*, while nodes actually give a much better visual representation of a lot of the processes that are happening*.
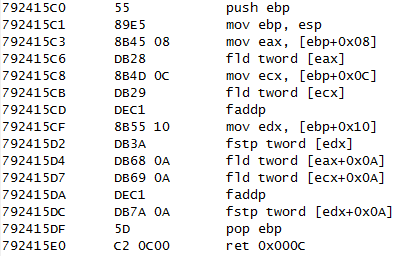
C itself also followed this trajectory, being a “human-readable” way of writing computer programs, to move away from hand-writing each specific instruction a CPU needs to do things. Writing these instructions manually is called “assembly programming” and it takes a lot more patience and logic to understand and write.* It looks like this*:
it gets worse
that image isn’t what cpu code actually looks like*; thats the human readable* format of it lol. in practice, this is converted to a series of bytes that the cpu traverses and interprets to execute programs.* (the middle part of the image kinda represents that)
in general the format of an assembly program is a list of instructions, each with some amount of arguments eg MOV a b (move a to b). if you aren’t familiar with these terms, its basically WHAT to do, then HOW to do it. the cpu reads the instruction, then does the thing with the parameters you give it.*
instructions tend to work on a block of memory* that is being modified and read from, to make calculations etc.*
while thinking about this, and talking about shaders with cool people on my cool discord, i had a terrible terrible idea. what if you encoded assembly instructions into an image, and wrote a shader to interpret and execute the instructions? a single shader that executes arbitrary programs, that are uploaded by providing a new texture to the shader. that sounds awful
so i did it
welcome to SHAD2; shaders, but much less powerful and much more difficult. able to execute up to 256 unique instructions, with a memory of 256 floats. lets get started
obviously i need to write an ide first
to build this system i needed 3 parts: some way to write text to write the program, a system to compile an assembly-like language into a texture to send to the shader, and the shader itself, to interpret the texture as a program. obviously i could just use any text editor but for fun and aesthetics i decided to create a little IDE* to write my programs with.
to render text to the screen i used the software text rendering created here, and got to work on inputting stuff. the code is stored as a List<string>, with the intention of parsing each line as an instruction, to give a clear scope for each one. text editing is never as trivial as i remember but it didn’t take too long to get a lil thing up and running. to give an example here’s what happens when you press any character*
if (Input.anyKeyDown) {
    // when handling a keypress we first need to check for special keys
    if (Input.GetKeyDown(KeyCode.Backspace)) {
        // depending on the current line we either delete a character, or delete the empty line
        if (code[line].Length > 0) {
            code[line] = code[line].Remove(pos - 1, 1);
            pos -= 1;
        } else {
            if (line > 0) {
                line -= 1;
                pos = code[line].Length;
                code.RemoveAt(code.Count-1);
            }
        }
    } else if (Input.GetKeyDown(KeyCode.Return)) {
        // hitting return in the middle of a line should move the rest of the line to a new one
        if (pos != code[line].Length) {
            string temp = code[line];
            code[line] = code[line].Substring(0, pos);
            temp = temp.Substring(pos);
            code.Insert(line+1, temp);
        } else {
            code.Add("");
        }
        line += 1;
        pos = 0;
    } else {
        // otherwise just add the new character to the current line
        string input = Input.inputString;

        code[line] = code[line].Insert(pos, input);
        pos += input.Length;
    }
}
there’s just so many edge cases, its a bit of a grind making it feel comfortable enough to code in. but once that was up and running i could get started on the cool stuff. i added a Classic Spinning Cube to preview the eventual shader and here we are

now onto compiling. the first thing is to decide exactly what our program will look like when compiled; after some back and forth i decided to go for the simplest route of encoding each instruction into a series of pixels. each pixel would lay out the data in the format:
R : instruction G : argument 1 B : argument 2 A : argument 3
this means each instruction can have a maximum of 3 arguments, and all instructions take up the same amount of space. at first i wanted to pack everything together to remove any wasted space, and fit more code into fewer pixels. so that if you have short instructions, the unused space was taken by the next instruction.
in this example I is instruction, and a is arguments. along the bottom is the RGBA components of a series of pixels
I a a I a a a I a I a a I a a a I a - -
R G B A,R G B A,R G B A,R G B A,R G B A
unfortunately i came across countless issues with this approach and while i believe it is possible, debugging shader code is a nightmare, especially when you’re working on such a ridiculous system, so i decided to fall back to the single instruction per pixel approach. this looks more like this
I a a - I a a a I a - - I a a - I a a a
R G B A,R G B A,R G B A,R G B A,R G B A
as you can see we can fit fewer instructions into the same amount of pixels, but it makes the implementation much easier.
what can we do
now we have decided what code will look like once encoded, we need to decide what kind of instructions we actually want. when thinking about assembly i tend to first think about instruction to manipulate memory, and do basic arithmetic. this is stuff like set (set a memory address to a specific value), mov (copy memory from one place to another), add, mul(tiply), sin, etc. however we’re also working in shaders so we need some specific shader instructions:
uv a     - copy the input uv coordinates to memory address a and a + 1 (since x, y coordinates are separate values)
tex a b  - read a texture input with uv coordinates from memory addresses a and a+1, and output the color to memory addresses b, b+1, b+2, b+3 (rgba values)
output a - output a pixel with the color defined at memory addresses a through a+3
along with some other helpers like time etc, this should provide us with enough to play with to prove the concept
to start with the compiling i created a little class to define each of these instructions with:
class SHAD2 {
    public int argCount;
    public string name;
    public SHAD2(string name, int argCount)
    {
        this.name = name;
        this.argCount = argCount;
    }
}
then wrote an array of all the instructions we want
SHAD2[] instructionDefs = new SHAD2[] {
    new SHAD2("noop", 0),
    new SHAD2("set", 2),
    new SHAD2("mov", 2),
    new SHAD2("vert", 1),
    new SHAD2("uv", 1),
    new SHAD2("normal", 1),
    new SHAD2("tex", 2),
    new SHAD2("add", 2),
    new SHAD2("sub", 2),
    new SHAD2("mul", 2),
    new SHAD2("div", 2),
    new SHAD2("sin", 2),
    new SHAD2("clamp", 1),
    new SHAD2("time", 1),
    new SHAD2("sqrt", 1),
    new SHAD2("sqr", 1),
    new SHAD2("output", 1)
};
compiling involves interating through each line of code, splitting into the separate parts and comparing the names/argument lengths to ensure they’re valid instructions. then it writes each one to a pixel as we defined before, with R being the instruction index, and the GBA being the relevant arguments.
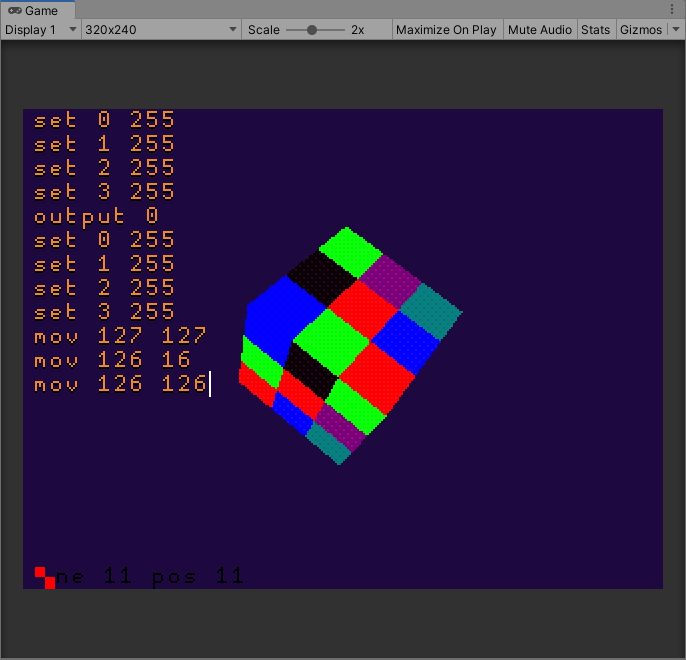
here we can see a compiled being previewed on the cube. here the texture is square, with the instructions wrapping round, but i eventually settled on having a single row of pixels, to again ease implementation.
so now the shader
to get started on the shader, i need to set up an array of memory, and a loop to iterate through all the pixels in the code texture
static int maxread = 64; // shaders don't like loops, so we need a static max length to iterate through, so it can unroll or something. this is essentially a hard limit to how long programs can be, i set it to 64 since i definitely didn't need that much but it can be higher

fixed4 frag (v2f input) : SV_Target
{

    int dataCount = _Code_TexelSize.z; // the instruction cound is equal to the width of the image
    float3 output = 0; // used for outputting colors
    float memory[256];

    for (int i = 0; i < 256; i++) {
        memory[i] = 0; // initialize memory to 0 because it can get wonky otherwise for some reason
    }

    float test = 0;

    for (int i = 0; i < maxread; i++) { // lets loop

        if (i >= dataCount) { // despite the maxread var, we can skip out early if we've reached the end of the program
            break;
        }

    }

    return float4(output, 1.0);
}
so how do we read and handle the instruction? possible using the Worst Thing You Can Do In A Shader: a huge if-else statement!!!!!
float4 pixel = tex2D(_Code, float2(i / _Code_TexelSize.z, 0)); // grab the current pixel
int4 bytes = pixel * 256.0; // store "byte" values of the pixels for ease of use
int instr = pixel.r * 256.0; // the instruction we're currently looking at

if (instr == 0) { /* do nothing */ } // ("noop", 0)
else if (instr == 1) { memory[bytes.g] = pixel.b; } // ("set", 2)
else if (instr == 2) { memory[bytes.b] = memory[bytes.g]; } // ("mov", 2)
else if (instr == 3) { } // ("vert", 1)
else if (instr == 4) { memory[bytes.g] = input.uv.x; memory[bytes.g + 1] = input.uv.y; } // ("uv", 1)
else if (instr == 5) { memory[bytes.g] = input.normal.x; memory[bytes.g + 1] = input.normal.y; memory[bytes.g + 2] = input.normal.y; } // ("normal", 1)
else if (instr == 6) {
    float2 uv;
    uv.x = memory[bytes.b];
    uv.y = memory[bytes.b + 1];
    float4 texread = tex2D(_Input, uv);
    memory[bytes.g] = texread.x;
    memory[bytes.g+1] = texread.y;
    memory[bytes.g+2] = texread.z;
    memory[bytes.g+3] = texread.w;
} // ("tex", 2)
else if (instr == 7) { memory[bytes.g] += memory[bytes.b]; } // ("add", 2)
else if (instr == 8) { memory[bytes.g] -= memory[bytes.b]; } // ("sub", 2)
else if (instr == 9) { memory[bytes.g] *= memory[bytes.b]; } // ("mul", 2)
else if (instr == 10) { memory[bytes.g] /= memory[bytes.b]; } // ("div", 2)
else if (instr == 11) { memory[bytes.g] = sin(memory[bytes.b]); } // ("sin", 2)
else if (instr == 12) { memory[bytes.g] = saturate(memory[bytes.g]); } // ("clamp", 1)
else if (instr == 13) { memory[bytes.g] = _Time.y; } // ("time", 1)
else if (instr == 14) { memory[bytes.g] = sqrt(memory[bytes.g]);} // ("sqrt", 1)
else if (instr == 15) { memory[bytes.g] *= memory[bytes.g];} // ("sqr", 1)
else if (instr == 16) {
    int readPos = bytes.g;
    output = float3(memory[readPos], memory[readPos + 1], memory[readPos + 2]);
} // ("output", 1)
as you can see, we’re just checking against each possible instruction individually, and running specific code to handle each one. simple!*
hope this helps
this was fun* but an entire waste of time*. hope this helps. feel free to check out the rest of my blog for more weird experiments and sometimes actually useful stuff*.
⚠️Feel free to contact me via twitter if you have any questions or comments
💛And please consider supporting me on patreon if you enjoy this work and would like me to do more
appendix as always
yes, i generated random textures and send that to the shader to see what would happen. disclaimer: i reduced the size of the memory to only 4 floats, and did a lot of wrapping of values to make sure things actually happened. very cool stuff happened tho, definitely worth it